
Domain Separation in ServiceNow

The blog is intended to showcase the basics of Domain Separation. This blog will help to understand what actually the domain separation is, how one can configure the same in their environment, what all modules are present and how domain hierarchy works etc.
What is Domain Separation?
Domain Separation in ServiceNow allows the logical separation of instance into separate domains. It allows defining discrete ServiceNow systems within one instance through which the single instance can support multiple organizations.
Domain Separation is beneficial for those who:
- Wants to segregate the business processes and the users for multiple organizations within one system.
- Wants to maintain the data separation among different business entities.
- Wants some global processes and global reports to be maintained.
How to Configure Domain Separation?
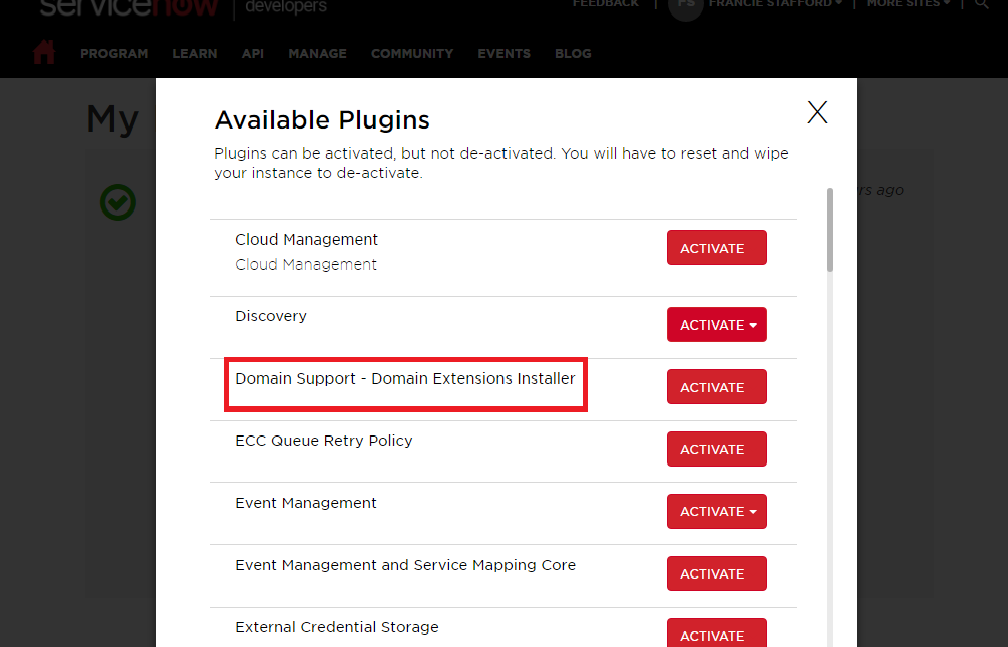
- To set up the Domain Separation, Admin needs to activate the plugin ‘Domain Support-Domain Extensions Installer ‘ through the developer instance.
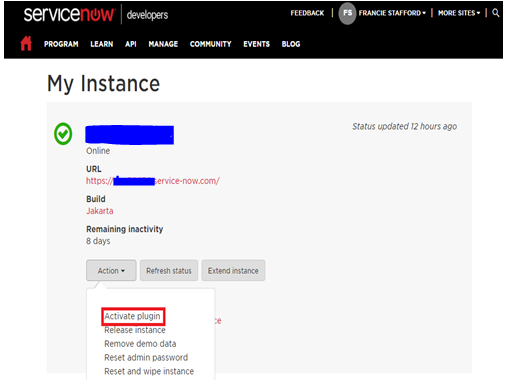
- Administrator can raise a request to activate the plugin mentioned above.
- After clicking on activate, it will take some time to get activated.
- Once activated, one can see the ‘Domain Admin’ application menu in Application navigator.
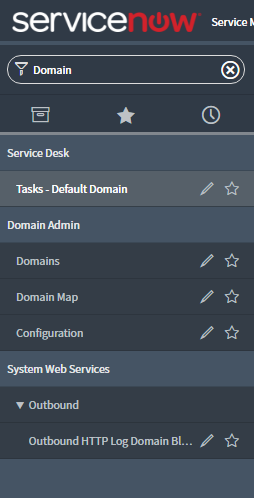
How to make use of ‘Domain Admin’ application?
- The Domain Admin application menu consist of three different modules
- Domains
- Domain Map
- Configuration
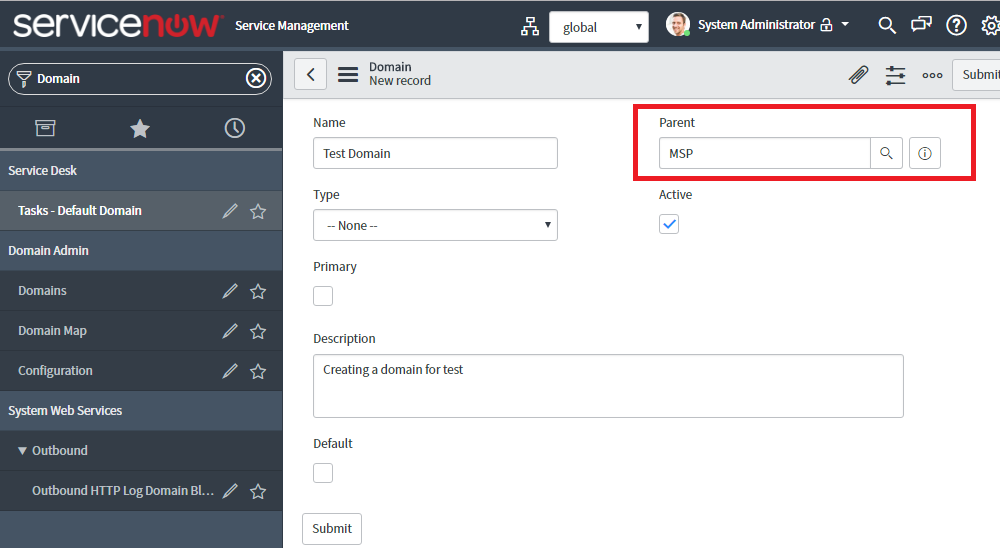
Domains Module:-
- Through this, admin can create new domain as per requirement.
- Also, admin can make changes in the existing domain.
- While creating domain admin should keep in mind that
- there can be only one primary domain
- there can be only one default domain
Domain Map Module:-
- Domain Map shows the graphical representation of the domains.
- This map shows the Primary, Parent and the Default domain in the hierarchy.
- OOTB ServiceNow has provided Top as a primary domain and Default as a default domain.
- Created test domain will get reflected in domain hierarchy as below:
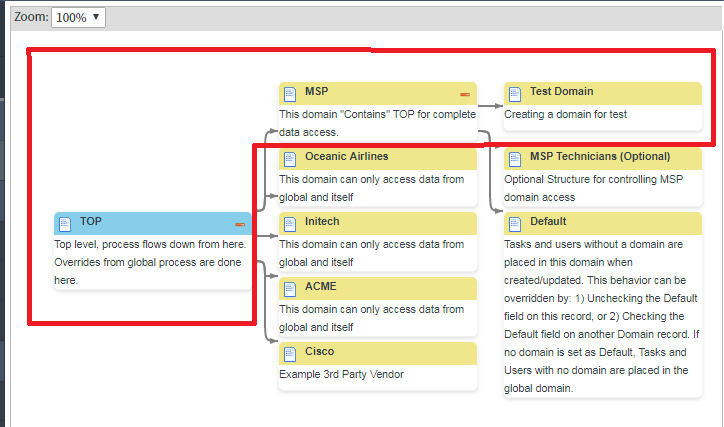
- OOTB TOP is the primary domain and a parent domain for MSP. As we have selected MSP as a parent for Test Domain, the hierarchy would be like TOP->MSP->Test Domain
Configuration Module:-
- The configuration module is the centralized setting for administrator to view and configure the domain separation.
- This module provides Domain table through which one can select any table that contain Domains. By default, Domain(sys_domain) is the table.
- It also has Domain validation alerts which list the validation issues in configuration.
- Domain Settings in this module allow administrator to enable, disable domain separation and delegated administration logging.
How to assign Domain?
- By default, when the domain plugin is activated, the sys_domain field gets added to that Task and its children form.
- We have few other ways to assign a domain as well. Few of them are illustrated below:
- Assign a domain to a company form:
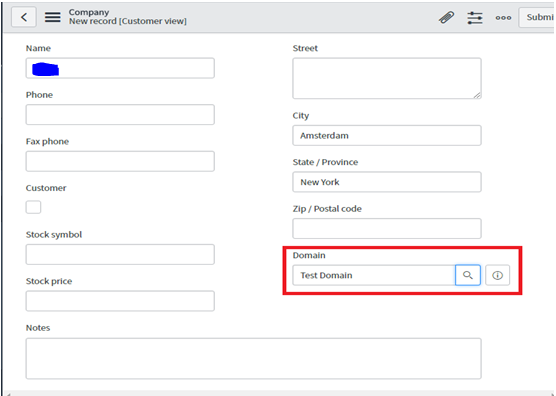
- Add the sys_domain field through form layout and assign a particular domain to it.
- Assigning a domain means that company belongs to that particular domain.
- Here Company XXXX belongs to the Test domain.
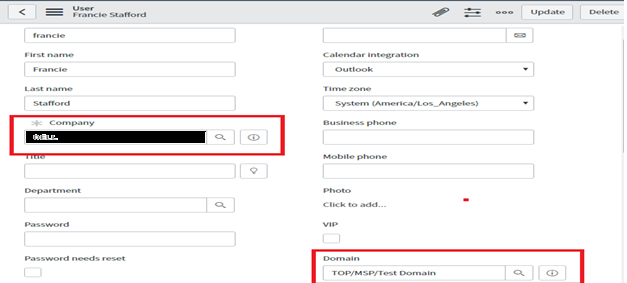
- Assign a user to company:
- Here assigning a company to user inherits its domain as well.
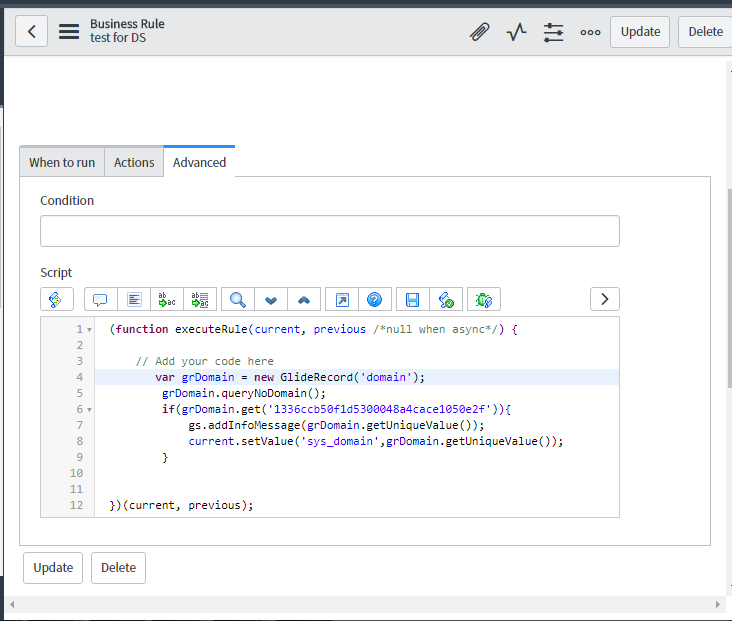
- Assign a domain through business rule:Administrator can assign a domain through business rule. They must ensure that the sys_domain field is present on form while creating a record.
- Assign a domain through Form Template:Administrator can assign a record in a particular domain through the form templates.
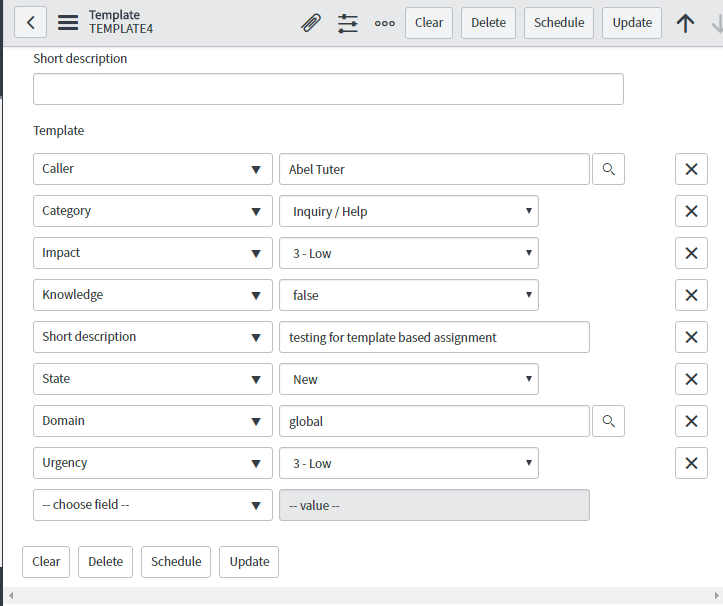 For template based assignment, create a record with sys_domain field on form. Create a template and later apply this template if one wants to assign a record into the same domain.
 - Assign a domain through Module:
- Administrator can assign a domain through a module. For assigning the same, administrator can create a module with Link type as URL(from Arguments) and Arguments assysparm_domain = Sys_ID of domain.
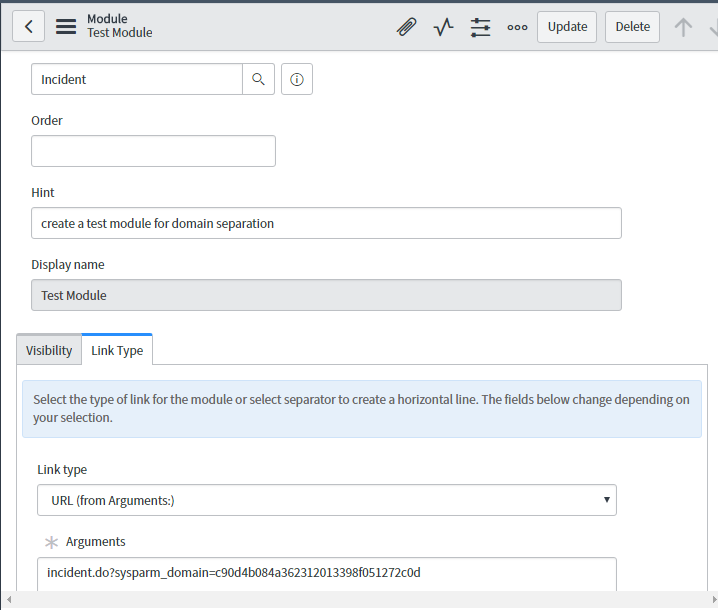
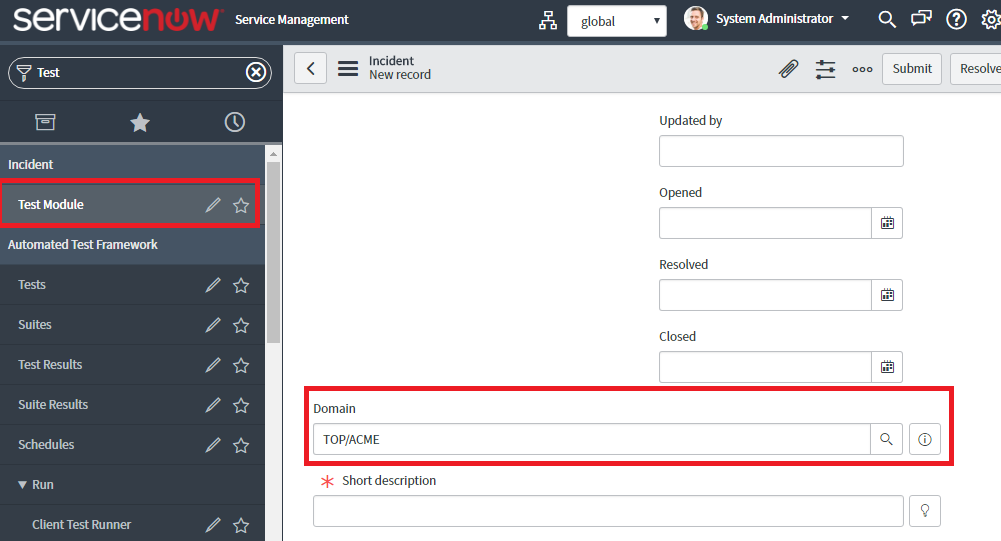 Here the domain field on incident record is auto populated based on Test Module.
 - Assign domain based on record:If all of the above conditions for assignment of domain are not met then the domain will get populated on the basis of person who created the record.For example, if the admin itself is creating an incident then the domain assigned to admin would be the same domain that will get assigned to that particular incident record.
- Assign a domain to a company form:
Domain Hierarchy:-
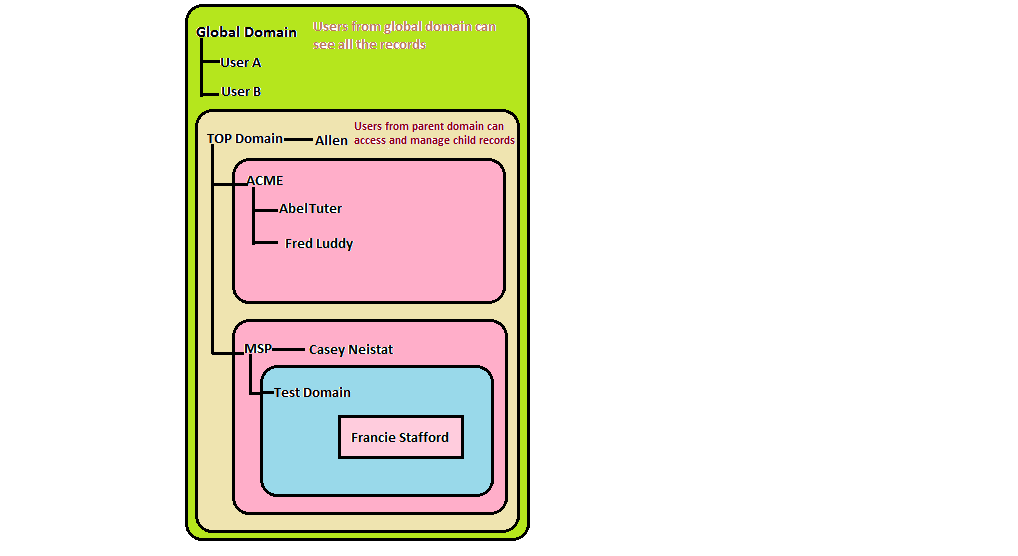
As per OOTB functionality, user belonging to a domain can see the data within their domain or their child domain (i.e. the domains which are lower in domain hierarchy). When the administrator activates the domain separation plugin, by default all users and all records are in the global domain until the administrator assign those users and records in some particular domain.
The above diagram depicts the domain hierarchy.
- User A and User B belongs to Global domain and can see all the records regardless of domain settings.
- Abel Tuter and Fred Luddy can see the records from ACME domain or the records from Global domain.
- Casey Neistat can see all the records from MSP domain or the records from Global Domain.
- Francie Stafford can access data from Test Domain or from Global domain.
- However, Allen from TOP Domain can see the records from ACME, MSP, Test Domain or the Global domain.
How to select a Domain?
Domain can be selected by administrator in two ways
- Domain Selector
- Domain Reference picker
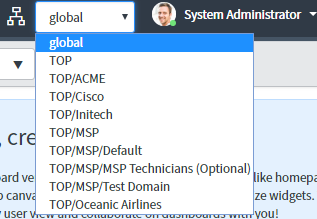
Domain Selector:-
Enabling Domain picker through system settings enables the Domain selector by default
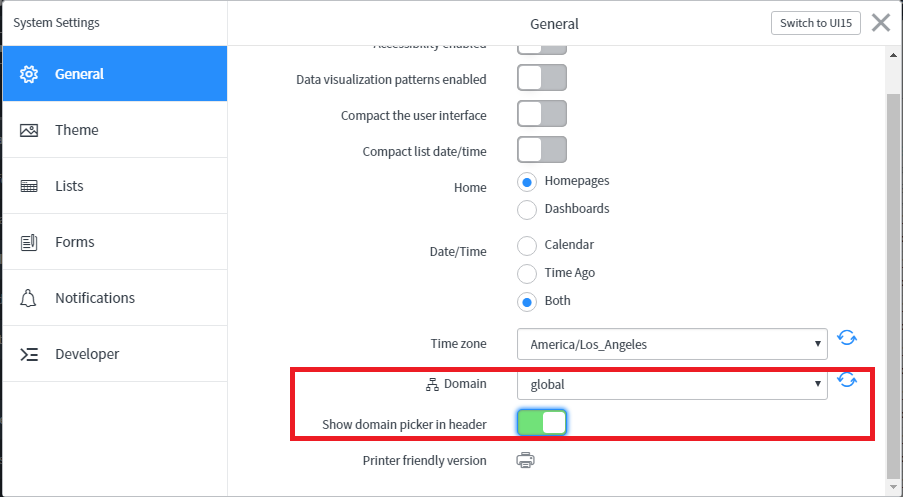
Through Domain selector one can select a domain through the list of available Domains.
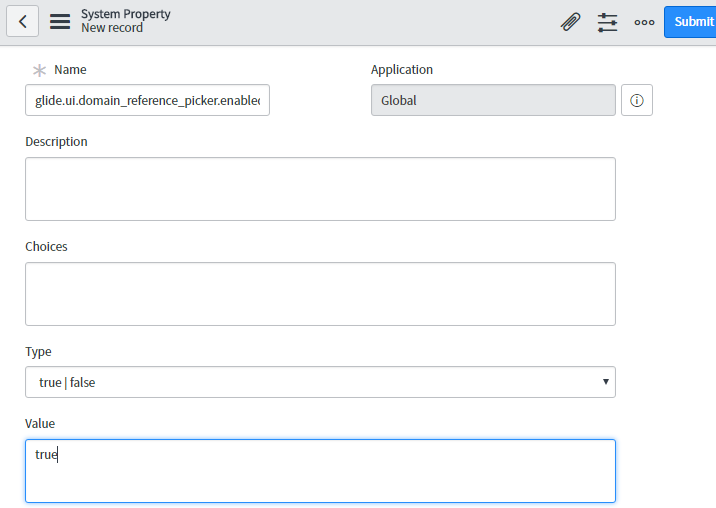
Domain Reference picker:
To enable the domain reference picker, administrator needs to enable the property glide.ui.domain_reference_picker.enabled to true.
If the property is not already present then create a new one and set the value to true as follows-
After refreshing the browser, one can see the reference picker is enabled.

We are pretty sure that this blog must have given an in-depth idea of configuring Domain Separation in ServiceNow.
Any comments\suggestions are most welcome. We have posted further blogs as well on other topics and will frequently come back with something innovative.